Working with Security Groups
Last changed: 2026-06-09
Security groups is an essential tool to understand in order for you to ensure the security and integrity of your instances, as well as making your application work correctly and as intended. This document attempts to explain what security groups are and how they work. We provide practical examples that you can use in your projects on NREC.
What is a Security Group?
The very short answer to this question is that a security group is a firewall. A security group contains a number of rules that define which traffic is allowed into (ingress) and out from (egress) your virtual machines (instances). The rules within a security group may allow only a single IP address/port combination, or they may open up completely and thereby negating the effect and protection of a firewall. It is utterly important that you understand what your security groups and the rules do and how they work, in order to properly secure your instances and applications.
Traffic to and from instances in NREC is by default completely closed. It is only by creating security groups and applying them that traffic is allowed to flow to and from the instances.
Script snippets to create common security groups
You may use the following bash script snippets to quickly create commonly used security groups:
Name |
Description |
Download |
|---|---|---|
ssh_icmp_from_login.uib.no |
Allows ssh and ping from login hosts at UiB |
|
ssh_icmp_from_login.uio.no |
Allows ssh and ping from login hosts at UiO |
|
ssh_icmp_from_uh_sector |
Allows ssh and ping from Norwegian UH sector |
|
uio_managed_v1 |
Minimal requirement for UiO Managed (v1) |
In all cases:
Review the script before running it! Make sure that it does what you want and expect
The scripts assume that you have a working CLI environment, see OpenStack API and CLI (command line interface)
If the security group is needed in both regions, you must run the script for each region
The “default” Security Group
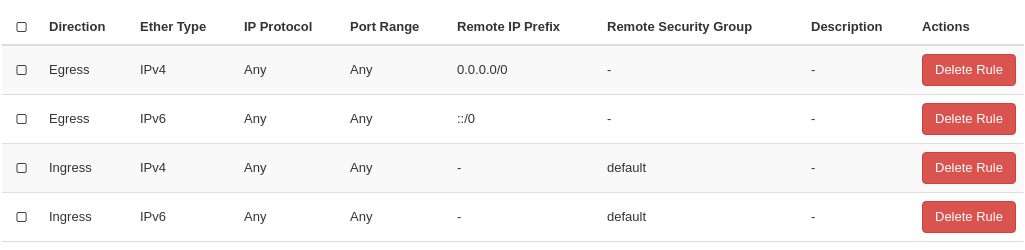
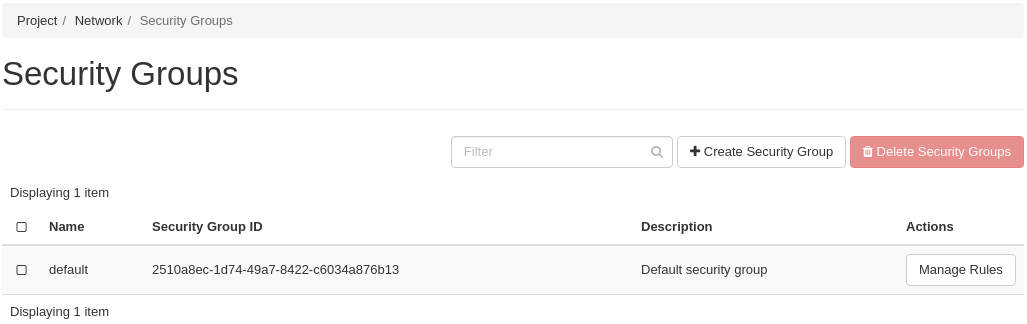
A newly created project in NREC will have a security group called “default”. This security group is unique for this project, and all project will have a security group called “default”. This security group cannot be deleted. To find it in the dashboard GUI, navigate to Project -> Network -> Security Groups and click on it. This security group contains four rules:
In order to view the same using the CLI, issue these commands:
$ openstack security group list
+--------------------------------------+--------------+------------------------+----------------------------------+------+
| ID                                   | Name         | Description            | Project                          | Tags |
+--------------------------------------+--------------+------------------------+----------------------------------+------+
| f6c0499c-0a3c-4756-8527-9cb58e0501b1 | default      | Default security group | a56e80c7c777419585b13ebafe024330 | []   |
+--------------------------------------+--------------+------------------------+----------------------------------+------+

$ openstack security group rule list default --long
+--------------------------------------+-------------+-----------+-----------+------------+-----------+--------------------------------------+
| ID                                   | IP Protocol | Ethertype | IP Range  | Port Range | Direction | Remote Security Group                |
+--------------------------------------+-------------+-----------+-----------+------------+-----------+--------------------------------------+
| 078cf6db-fe5b-4573-9c69-33c1f45b475d | None        | IPv6      | ::/0      |            | egress    | None                                 |
| 35aade0c-545d-4a22-bb15-a49a72968149 | None        | IPv4      | 0.0.0.0/0 |            | ingress   | f6c0499c-0a3c-4756-8527-9cb58e0501b1 |
| 51141d27-2d64-47db-a7a3-71f155a8ff3d | None        | IPv6      | ::/0      |            | ingress   | f6c0499c-0a3c-4756-8527-9cb58e0501b1 |
| 9193943c-6ee2-4a80-8eed-a97dae9f5244 | None        | IPv4      | 0.0.0.0/0 |            | egress    | None                                 |
+--------------------------------------+-------------+-----------+-----------+------------+-----------+--------------------------------------+
As we can see, the “default” security group contains two egress (outgoing traffic) rules and two ingress rules (incoming traffic). We will discuss the egress rules first.
Egress Rules (outgoing traffic)
The two egress rules do exactly the same, but one of them targets IPv4 and the other targets IPv6. They open up the firewall completely, as we can see clearly in the dashboard by the use of the word Any, but remember the this is outgoing traffic, i.e. from the instance to the outside world.
While the dashboard simplifies this by using the word Any for the protocol, port range and IP range, the CLI offers the same by having None for protocol, not defining any port range and using the CIDR notations 0.0.0.0/0 and ::/0 for the IP range. More about using CIDR notations later.
Ingress Rules (incoming traffic)
As we can see, the ingress rules opens up in the same way as the egress rules. However, this is mitigated by the Remote Security Group value applied to the ingress rules. This limits the rules such that they only apply to instances that has applied the listed remote security group.
In case of the “default” security group, the remote security group listed is itself. You can see this in the dashboard as it is listed by name. In the CLI, we see that the ID of the remote security group in the ingress rules matches the ID of the “default” security group.
Summary
In summary, the “default” security group does the following:
All outgoing traffic is allowed. The instance may initiate contact and communicate with any host on the internet, on any port using any protocol
All incoming traffic is allowed from other instances within the same project, if they also have the “default” security group applied.
In short, this security group allows the instances to communicate with hosts on the internet as long as the traffic is initiated from the inside, and to communicate freely with each other:

This figure shows how the “default” security group works, if applied to two instances in the same project. Incoming traffic from the outside is blocked, while outgoing traffic and all inter-instance traffic is allowed.
Our recommendations about the “default” security group are:
Don’t change anything about this security group. Leave it intact
Apply this security group on all your instances unless there are special security concerns, specifically regarding the egress rules which you may want to tighten
Most instances will run services that require additional firewall rules. Our recommendation is to create new security groups with the required ruleset, and apply those in addition to the default security group.
Understanding CIDR notations
For the gritty details about CIDR see CIDR (Wikipedia). In short, CIDR notation is a way to specify a set of consecutive IP addresses (i.e. an “IP block”) in a standardized way, via a compact representation of an IP address and its associated network mask. In order to fully understand this a deep dive into IPv4 and IPv6 address masking using binary numbers is required. This is beyond the scope of this document. We will try to explain this more superficially. This is an example of a IPv4 blocks using CIDR:
|
All IPv4 addresses in the known universe |
|
All 16,384 addresses from |
|
All 256 addresses from |
|
All 32 addresses from |
|
The single IPv4 address |
The important thing to understand is that the last number designates the size of the block. The larger the number, the smaller the block. CIDR notation applies to IPv6 as well:
|
All IPv6 addresses in the known universe |
|
All \(2^{96}\) addresses from
|
|
All \(2^{72}\) addresses from
|
|
All \(2^{64}\) addresses from
|
|
All \(2^{32}\) addresses from
|
|
The single IPv6 address |
The actual number of IPv6 addresses that the ranges contain is so large we have omitted them from this list.
Important
When you wish to specify a single IP address, be careful when using
CIDR notation. Use /32 and /128 for IPv4 and IPv6,
respectively, or just omit the mask and simply specify the IP
address without a mask.
A mask of /0 will be accepted by the system even if the IP
address part is not what we would consider to be “correct”. This
means that 129.240.12.61/0 will be interpreted as 0.0.0.0/0 for
IPv4. The same applies to IPv6.
When unsure about what range of addresses that a CIDR notation contains, visit a CIDR Calculator to make sure. There are many of them on the internet, but here are a couple of suggestions:
Useful CIDR addresses
Below is a list of CIDR addresses that you may find useful when creating security group rules.
CIDR |
IP Protocol |
Comment |
|---|---|---|
|
IPv4 |
Entire UiO network |
|
IPv6 |
Entire UiO network [1] |
|
IPv4 |
Entire UiB network |
|
IPv6 |
Entire UiB network |
In addition, the login services at UiO and UiB is also useful to know when creating security group rules:
- UiO login hosts
IPv4:
129.240.114.32/28129.240.114.48/28
IPv6:
2001:700:100:8070::/642001:700:100:8071::/64
- UiB login hosts
IPv4:
129.177.13.204/32IPv6:
2001:700:200:13::204/128
IP ranges in NREC may change as more blocks are added. You can list the NREC subnets (CIDR addresses) with these commands, that shows the subnets in the IPv6 and dualStack networks. This is region specific, example is for the OSL region:
$ openstack subnet list --network IPv6 -c Name -c Subnet
+---------------+----------------------+
| Name          | Subnet               |
+---------------+----------------------+
| public1_IPv6  | 2001:700:2:8201::/64 |
| private1_IPv4 | 10.2.0.0/22          |
+---------------+----------------------+

$ openstack subnet list --network dualStack -c Name -c Subnet
+--------------+----------------------+
| Name         | Subnet               |
+--------------+----------------------+
| public2_IPv4 | 158.39.75.0/24       |
| public6_IPv4 | 158.37.66.0/24       |
| public2_IPv6 | 2001:700:2:8200::/64 |
| public1_IPv4 | 158.37.63.0/24       |
| public4_IPv4 | 158.39.48.0/24       |
| public5_IPv4 | 158.39.200.0/24      |
+--------------+----------------------+
Creating a Security Group
In order to create a new security group using the dashboard, navigate to Project -> Network -> Security Groups:
Click on Create Security Group and the following dialog window appears:
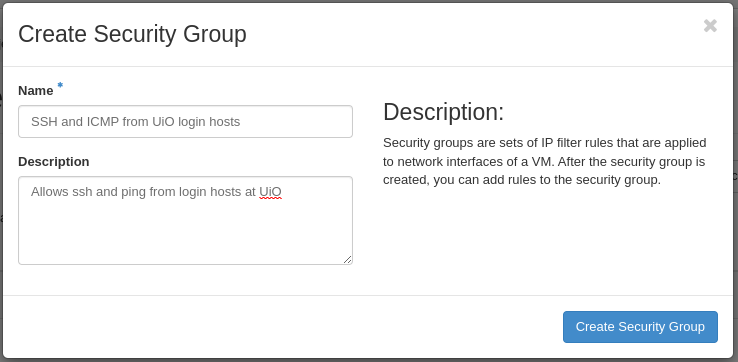
You have to give the new security group a name, and optionally a description. After creating the security group, you are redirected to the page in which you will create and edit its rules:
In order to create a security group using the CLI, use the command
openstack security group create:
$ openstack security group create --description 'Allows ssh and ping from login hosts at UiO' 'SSH and ICMP from UiO login hosts'
(...output omitted...)
As in the dashboard, the description is optional.
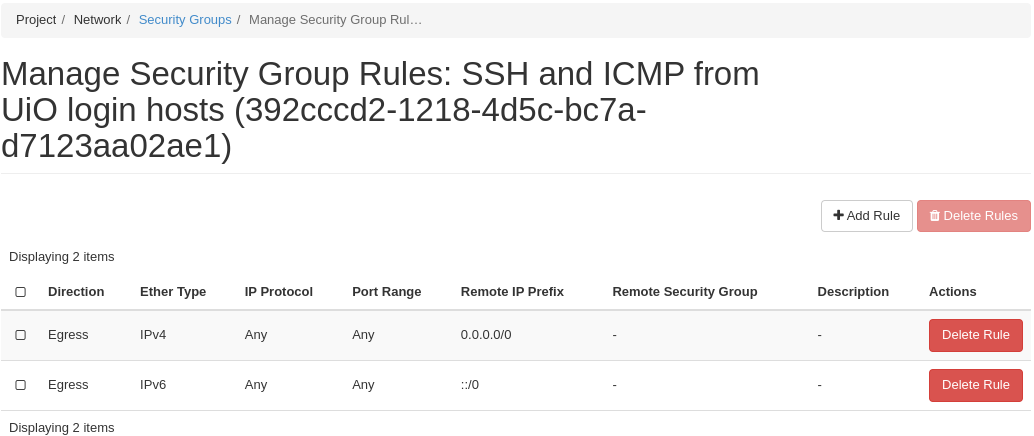
We have successfully created a security group. This security group will by default have the same two egress rules (outgoing traffic) that are present in the “default” security group, i.e. all outgoing traffic is allowed. You may wish to edit or delete these two rules.
Adding Rules
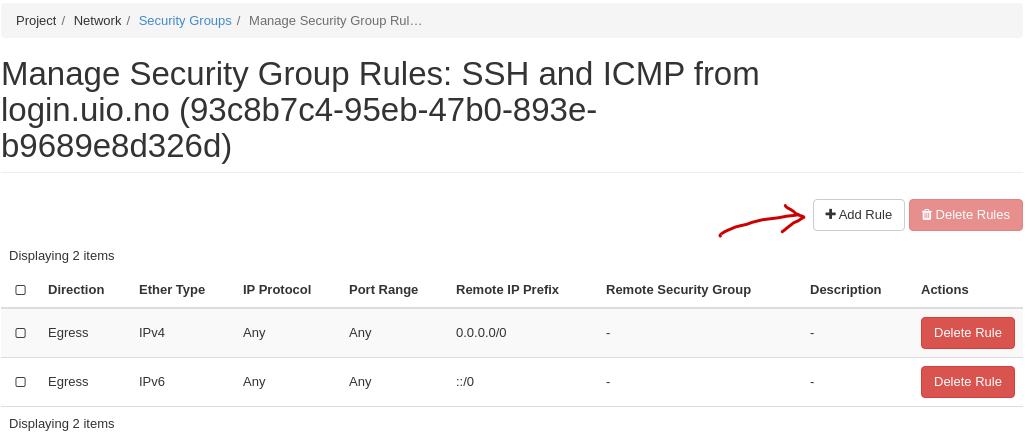
In order to add security group rules, navigate to the security group that you wish to edit and click Add Rule:
In our case, we wish to add SSH and ICMP (ping) access from the host login.uio.no:
$ host login.uio.no
login.uio.no is an alias for login-2fa-azure.uio.no.
login-2fa-azure.uio.no has address 129.240.114.36
login-2fa-azure.uio.no has address 129.240.114.52
login-2fa-azure.uio.no has IPv6 address 2001:700:100:8070::36
login-2fa-azure.uio.no has IPv6 address 2001:700:100:8071::52
As we can see, login.uio.no is actually two hosts. In order to future proof our security group wrt. changes to the login sercice, we should allow traffic from these subnets that are specifically used for login hosts at UiO:
129.240.114.32/28/2001:700:100:8070::/64129.240.114.48/28/2001:700:100:8071::/64
We want to add rules that allow:
ICMP over IPv4 from
129.240.114.32/28and129.240.114.48/28ICMP over IPv6 from
2001:700:100:8070::/64and2001:700:100:8071::/64SSH over IPv4 from
129.240.114.32/28and129.240.114.48/28SSH over IPv6 from
2001:700:100:8070::/64and2001:700:100:8071::/64
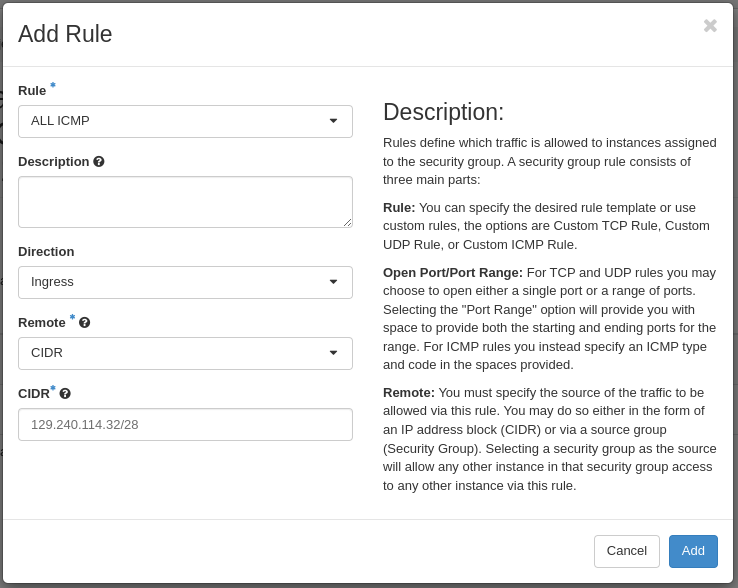
We start with ICMP over IPv4. We select All ICMP for the rule,
omit the optional description, and leave the Direction
and Remote as “Ingress” and “CIDR”, respectively. In the CIDR
field, we enter the first IPv4 CIDR address (129.240.114.32/28)
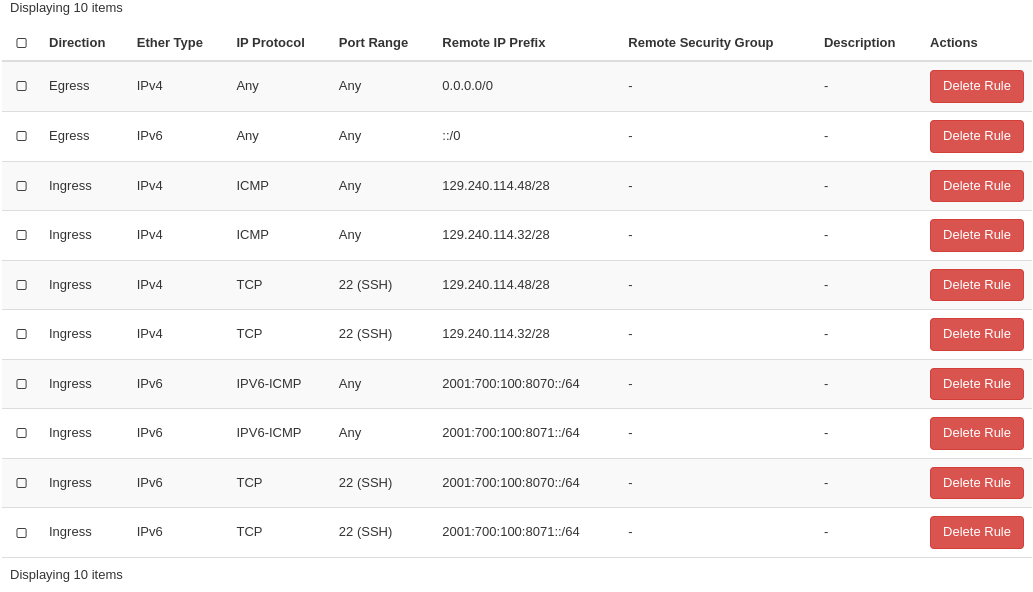
for login hosts as mentioned above:
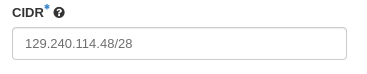
And the same for the second CIDR address (129.240.114.48/28):
For the ICMP over IPv6 rules, we do exactly the same except entering the IPv6 CIDR addresses in the CIDR field:


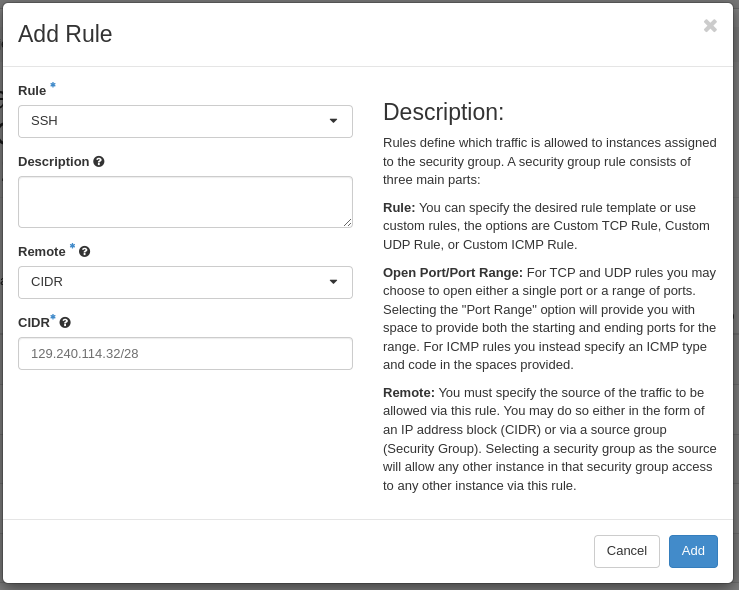
For the SSH rules, we repeat the steps for ICMP, except choosing “SSH” in the Rule drop-down menu (example for the first Ipv4 CIDR address):
After creating all rules, it should look like this:
Creating security group rules can also be done using CLI. First we list our security groups:
$ openstack security group list
+--------------------------------------+-----------------------------------+---------------------------------------------+----------------------------------+------+
| ID                                   | Name                              | Description                                 | Project                          | Tags |
+--------------------------------------+-----------------------------------+---------------------------------------------+----------------------------------+------+
| 502bd0d6-91ab-4772-8fab-4ec1275372cf | SSH and ICMP from UiO login hosts | Allows ssh and ping from login hosts at UiO | e55fe3f025894c62a100713e92193e64 | []   |
| 5e3a9975-667b-46b7-9fdc-629ae8d09368 | default                           | Default security group                      | e55fe3f025894c62a100713e92193e64 | []   |
+--------------------------------------+-----------------------------------+---------------------------------------------+----------------------------------+------+
When specifying the security group we can use either the ID or the name of the security group. Since the name in our case contains spaces we’re opting to use the ID. Adding the rules (omitting output):
$ openstack security group rule create --ethertype IPv4 --protocol icmp \
    --remote-ip 129.240.114.32/28 502bd0d6-91ab-4772-8fab-4ec1275372cf

$ openstack security group rule create --ethertype IPv4 --protocol icmp \
    --remote-ip 129.240.114.48/28 502bd0d6-91ab-4772-8fab-4ec1275372cf

$ openstack security group rule create --ethertype IPv6 --protocol ipv6-icmp \
    --remote-ip 2001:700:100:8070::/64 502bd0d6-91ab-4772-8fab-4ec1275372cf

$ openstack security group rule create --ethertype IPv6 --protocol ipv6-icmp \
    --remote-ip 2001:700:100:8071::/64 502bd0d6-91ab-4772-8fab-4ec1275372cf

$ openstack security group rule create --ethertype IPv4 --protocol tcp --dst-port 22 \
    --remote-ip 129.240.114.32/28 502bd0d6-91ab-4772-8fab-4ec1275372cf

$ openstack security group rule create --ethertype IPv4 --protocol tcp --dst-port 22 \
    --remote-ip 129.240.114.48/28 502bd0d6-91ab-4772-8fab-4ec1275372cf

$ openstack security group rule create --ethertype IPv6 --protocol tcp --dst-port 22 \
    --remote-ip 2001:700:100:8070::/64 502bd0d6-91ab-4772-8fab-4ec1275372cf

$ openstack security group rule create --ethertype IPv6 --protocol tcp --dst-port 22 \
    --remote-ip 2001:700:100:8071::/64 502bd0d6-91ab-4772-8fab-4ec1275372cf
After creating the rules, we can list all rules in the security group for inspection:
$ openstack security group rule list 502bd0d6-91ab-4772-8fab-4ec1275372cf
+--------------------------------------+-------------+-----------+------------------------+------------+-----------+-----------------------+----------------------+
| ID                                   | IP Protocol | Ethertype | IP Range               | Port Range | Direction | Remote Security Group | Remote Address Group |
+--------------------------------------+-------------+-----------+------------------------+------------+-----------+-----------------------+----------------------+
| 11698bdf-6fcd-45e3-b69d-d08811dbdce9 | tcp         | IPv6      | 2001:700:100:8070::/64 | 22:22      | ingress   | None                  | None                 |
| 24b8ab82-c596-4a59-bb8e-3733626ce6a3 | ipv6-icmp   | IPv6      | 2001:700:100:8070::/64 |            | ingress   | None                  | None                 |
| 28f5795b-012a-4be6-909a-70ff6ee3fb0e | ipv6-icmp   | IPv6      | 2001:700:100:8071::/64 |            | ingress   | None                  | None                 |
| 38fa042b-f865-42fe-8604-664439a062fb | icmp        | IPv4      | 129.240.114.32/28      |            | ingress   | None                  | None                 |
| 767edc46-65d0-47cd-9ac5-8e72a1305cc5 | tcp         | IPv4      | 129.240.114.48/28      | 22:22      | ingress   | None                  | None                 |
| ac765beb-9d4b-415a-b449-64ba9036b74d | tcp         | IPv4      | 129.240.114.32/28      | 22:22      | ingress   | None                  | None                 |
| bd4d4340-d014-4e2d-82f3-680a521ce16d | None        | IPv6      | ::/0                   |            | egress    | None                  | None                 |
| c697fb13-c555-4a54-ab98-a6440dfc799a | tcp         | IPv6      | 2001:700:100:8071::/64 | 22:22      | ingress   | None                  | None                 |
| dba5f73d-a7ec-4452-aec9-07b9f8b82373 | icmp        | IPv4      | 129.240.114.48/28      |            | ingress   | None                  | None                 |
| df890224-2b36-4ad9-a298-699b99d21036 | None        | IPv4      | 0.0.0.0/0              |            | egress    | None                  | None                 |
+--------------------------------------+-------------+-----------+------------------------+------------+-----------+-----------------------+----------------------+
Remote Security Group
When creating a security group rule we have the option of using a security group as remote, instead of a CIDR address. This can be particularly useful for internal communication between instances in the same project running different layers of an application. As instances are deleted and recreated, they will have a different set of IP addresses. Using CIDR addresses in this situation can present a maintenance challenge.
We have already seen use of remote security groups when we discussed the “default” security group above. If you’re applying the “default” security group on all your instances anyway you don’t need additional inter-instance communication rules. The “default” security group already allows any communication between instances on which it is applied. However, for extra security you may want to opt out of the “default” security group and specify a narrower window of communication between instances.
The remote security group will work regardless it the hosts have a private IPv4 address (i.e. the “IPv6” network) or they have a public IPv4. There are a couple of limitations when using a security group as remote:
It only works between security groups in the same project
It only works within the same region
Consider the following situation:
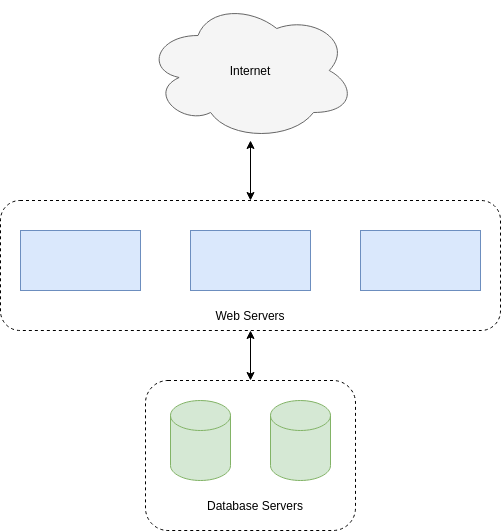
In this hypothetical scenario we have three web servers that uses two database servers as backend. In order to protect the infrastructure we want to restrict communication as follows:
The web servers are exposed to the internet via port 443 (HTTPS)
The database servers are not exposed on the internet at all
There should be intercommunication between the database servers and the web servers. The database servers should allow traffic over the database port from the web servers and nothing else
We can solve the last problem by using a security group as remote. In our hypothetical scenario, we already have security groups for the database and web servers:
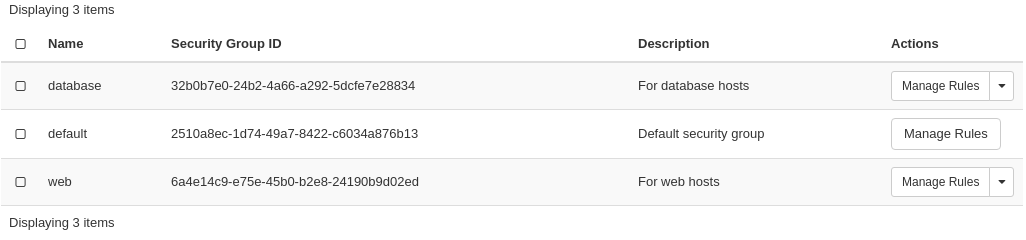
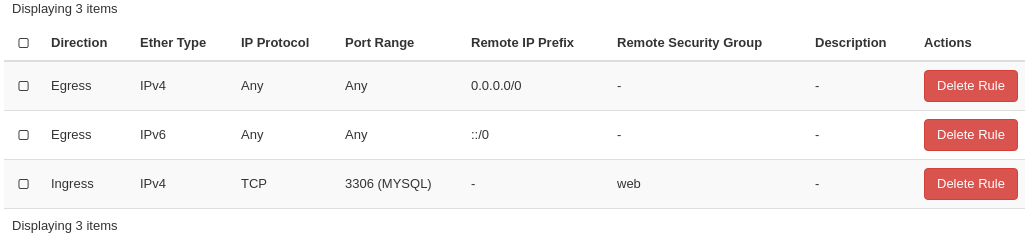
The “database” security group is applied on the database servers, and the “web” security group is applied on the web servers. In order to allow the web servers to initiate a connection to the MySQL port on the database servers, we need to add a rule in the “database” security group, using the “web” security group as remote:
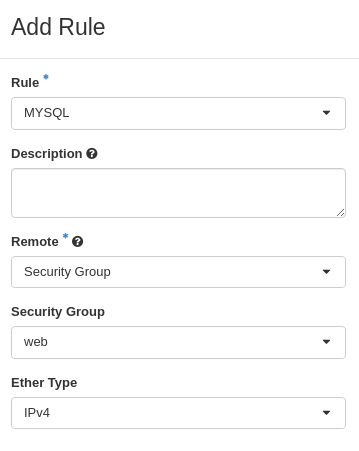
We select “Security Group” as our Remote instead of CIDR, which is the default. We then select the “web” security group as the remote. The security group rules now contains this new rule:
Creating a security group rule that uses another security group as remote can also be done using CLI. First, we list our security groups:
$ openstack security group list
+--------------------------------------+----------+------------------------+----------------------------------+------+
| ID                                   | Name     | Description            | Project                          | Tags |
+--------------------------------------+----------+------------------------+----------------------------------+------+
| 6698059e-c82b-4694-975c-55c47c8e0151 | database | database               | 24823ac5a6dd4d27966310600abce54d | []   |
| 6743c744-1a06-462e-82e6-85c9d0b2399f | default  | Default security group | 24823ac5a6dd4d27966310600abce54d | []   |
| ad67b1c0-32bd-44a9-919b-64195870e136 | web      | web                    | 24823ac5a6dd4d27966310600abce54d | []   |
+--------------------------------------+----------+------------------------+----------------------------------+------+
We then add the new rule:
$ openstack security group rule create --ethertype IPv4 --protocol tcp --dst-port 3306 --remote-group web database
(...output omitted...)
As before, you can use the security group name or ID with these commands. We list the contents of the “database” security group for verification:
$ openstack security group rule list --long database
+--------------------------------------+-------------+-----------+-----------+------------+-----------+--------------------------------------+
| ID                                   | IP Protocol | Ethertype | IP Range  | Port Range | Direction | Remote Security Group                |
+--------------------------------------+-------------+-----------+-----------+------------+-----------+--------------------------------------+
| 7c5ac04f-b1f9-4801-a6d2-ed2102a46b42 | None        | IPv6      | ::/0      |            | egress    | None                                 |
| 8148364c-93d5-4fdd-a5ac-04ec6d9215e4 | tcp         | IPv4      | 0.0.0.0/0 | 3306:3306  | ingress   | ad67b1c0-32bd-44a9-919b-64195870e136 |
| 961a5cc5-fe0b-4d31-9aad-826e5cbed232 | None        | IPv4      | 0.0.0.0/0 |            | egress    | None                                 |
+--------------------------------------+-------------+-----------+-----------+------------+-----------+--------------------------------------+
Deleting Rules
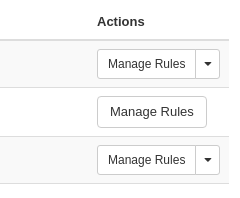
To delete a security group rule using the dashboard, first navigate to Project -> Network -> Security Groups and click on Manage Rules for the security group in question.
In the rules listing, click on Delete Rule for the rule you wish to delete:
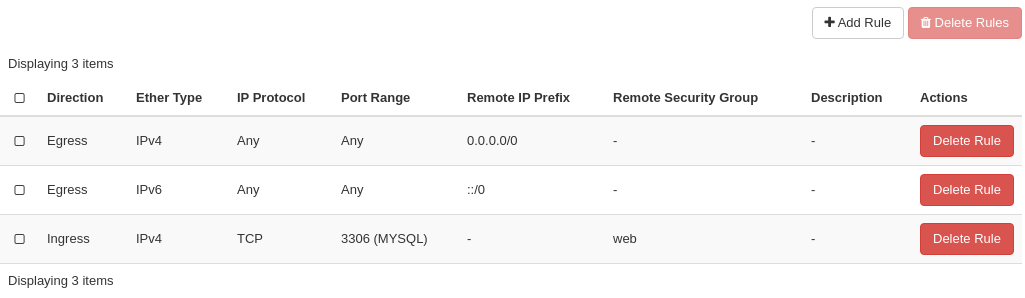
Optionally, you can mark the rule using the radio buttons to the left and click Delete Rules. This is faster if you want to delete several rules simultaneously.
Deleting a security group rule using the CLI can be done like this:
First we list the contents of the security group, in order to find the ID of the rule we want to delete:
$ openstack security group rule list --long database
+--------------------------------------+-------------+-----------+-----------+------------+-----------+--------------------------------------+
| ID                                   | IP Protocol | Ethertype | IP Range  | Port Range | Direction | Remote Security Group                |
+--------------------------------------+-------------+-----------+-----------+------------+-----------+--------------------------------------+
| 7c5ac04f-b1f9-4801-a6d2-ed2102a46b42 | None        | IPv6      | ::/0      |            | egress    | None                                 |
| 8148364c-93d5-4fdd-a5ac-04ec6d9215e4 | tcp         | IPv4      | 0.0.0.0/0 | 3306:3306  | ingress   | ad67b1c0-32bd-44a9-919b-64195870e136 |
| 961a5cc5-fe0b-4d31-9aad-826e5cbed232 | None        | IPv4      | 0.0.0.0/0 |            | egress    | None                                 |
+--------------------------------------+-------------+-----------+-----------+------------+-----------+--------------------------------------+
Once we know the ID, we can delete the rule:
$ openstack security group rule delete 8148364c-93d5-4fdd-a5ac-04ec6d9215e4
Lastly, we list the rules again to verify that the rule was deleted:
$ openstack security group rule list --long database
+--------------------------------------+-------------+-----------+-----------+------------+-----------+-----------------------+
| ID                                   | IP Protocol | Ethertype | IP Range  | Port Range | Direction | Remote Security Group |
+--------------------------------------+-------------+-----------+-----------+------------+-----------+-----------------------+
| 7c5ac04f-b1f9-4801-a6d2-ed2102a46b42 | None        | IPv6      | ::/0      |            | egress    | None                  |
| 961a5cc5-fe0b-4d31-9aad-826e5cbed232 | None        | IPv4      | 0.0.0.0/0 |            | egress    | None                  |
+--------------------------------------+-------------+-----------+-----------+------------+-----------+-----------------------+
Deleting a Security Group
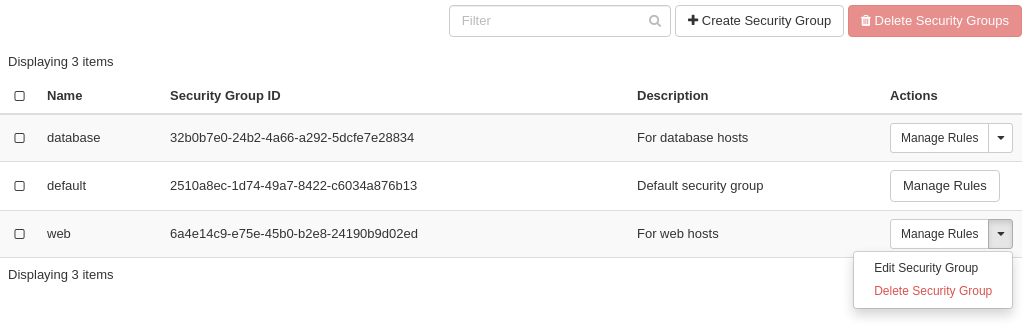
To delete a security group using the dashboard, navigate to Project -> Network -> Security Groups. Use the menu on the right of the security group you want to delete an select Delete Security Group:
Optionally, you can mask the security group using radio buttons to the left and click Delete Security Groups. This is faster if you want to delete several security groups simultaneously.
To delete a security group using the CLI:
We first list our security groups:
$ openstack security group list
+--------------------------------------+----------+------------------------+----------------------------------+------+
| ID                                   | Name     | Description            | Project                          | Tags |
+--------------------------------------+----------+------------------------+----------------------------------+------+
| 6698059e-c82b-4694-975c-55c47c8e0151 | database | database               | 24823ac5a6dd4d27966310600abce54d | []   |
| 6743c744-1a06-462e-82e6-85c9d0b2399f | default  | Default security group | 24823ac5a6dd4d27966310600abce54d | []   |
| ad67b1c0-32bd-44a9-919b-64195870e136 | web      | web                    | 24823ac5a6dd4d27966310600abce54d | []   |
+--------------------------------------+----------+------------------------+----------------------------------+------+
We then delete the security group, specifying it either by name or ID:
$ openstack security group delete 6698059e-c82b-4694-975c-55c47c8e0151
Finally, we list the security groups again to verify:
$ openstack security group list
+--------------------------------------+---------+------------------------+----------------------------------+------+
| ID                                   | Name    | Description            | Project                          | Tags |
+--------------------------------------+---------+------------------------+----------------------------------+------+
| 6743c744-1a06-462e-82e6-85c9d0b2399f | default | Default security group | 24823ac5a6dd4d27966310600abce54d | []   |
| ad67b1c0-32bd-44a9-919b-64195870e136 | web     | web                    | 24823ac5a6dd4d27966310600abce54d | []   |
+--------------------------------------+---------+------------------------+----------------------------------+------+
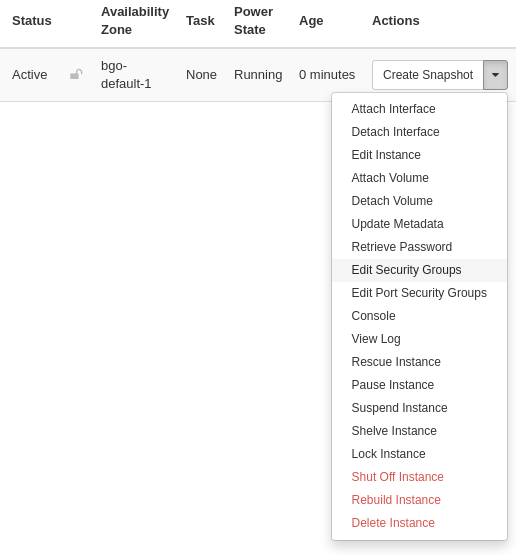
Apply or Remove Security Groups
A security group is meaningless unless applied to one or more virtual machines (instances). In order to apply or remove security groups from an instance, navigate to Project -> Compute -> Instances, and select Edit Security Groups from the drop-down menu for the instance:
The following dialog window will appear:
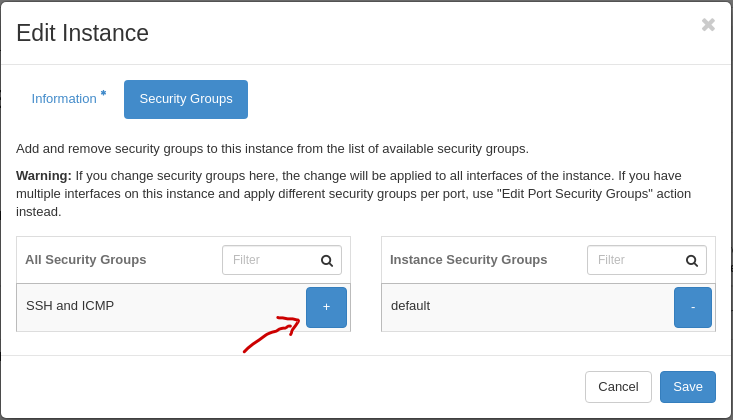
Edit the security groups for the instance by adding or removing with the + and - buttons, and click Save:
Adding and removing security groups from a server can also be done using the CLI. First, we list our servers and security groups:
$ openstack server list
+--------------------------------------+------+--------+----------------------------------------+---------------+----------+
| ID                                   | Name | Status | Networks                               | Image         | Flavor   |
+--------------------------------------+------+--------+----------------------------------------+---------------+----------+
| da187bf2-ff3d-43f4-8256-90482061fd04 | test | ACTIVE | IPv6=10.1.2.137, 2001:700:2:8301::1366 | GOLD CentOS 8 | m1.small |
+--------------------------------------+------+--------+----------------------------------------+---------------+----------+

$ openstack security group list
+--------------------------------------+--------------+------------------------------+----------------------------------+------+
| ID                                   | Name         | Description                  | Project                          | Tags |
+--------------------------------------+--------------+------------------------------+----------------------------------+------+
| 2510a8ec-1d74-49a7-8422-c6034a876b13 | default      | Default security group       | 24823ac5a6dd4d27966310600abce54d | []   |
| 5471b535-b3e3-4ed7-96b0-885e71148537 | SSH and ICMP | Allows incoming SSH and ICMP | 24823ac5a6dd4d27966310600abce54d | []   |
+--------------------------------------+--------------+------------------------------+----------------------------------+------+
We can see which security groups are applied to a server by inspecting
the server using openstack server show:
$ openstack server show test -c security_groups
+-----------------+----------------+
| Field           | Value          |
+-----------------+----------------+
| security_groups | name='default' |
+-----------------+----------------+
In this case only the “default” security group is applied. To apply our “SSH and ICMP” security group:
$ openstack server add security group test 'SSH and ICMP'
We can then inspect the server again:
$ openstack server show test -c security_groups
+-----------------+---------------------+
| Field           | Value               |
+-----------------+---------------------+
| security_groups | name='default'      |
|                 | name='SSH and ICMP' |
+-----------------+---------------------+
We can also remove a security group from a server. Here, we are removing the “SSH and ICMP” security group from the server “test”:
$ openstack server remove security group test 'SSH and ICMP'
As with most Openstack commands, we can use either the ID or the name when specifying security groups and instances.
Footnotes